百度智能云平台的人脸识别项目,旨在利用其强大的人脸识别服务实现自动人脸识别。选择百度智能云的原因是其高效的API接口和稳定的服务质量,能够帮助开发者快速实现人脸识别应用。
本项目使用摄像头捕捉图像后,通过百度智能云平台的人脸识别服务,能够轻松识别图像中的人脸,并将识别结果实时显示在Qt界面上。
1、图片处理和人脸识别:使用百度智能云的人脸识别服务,通过API轻松识别图像中的人脸。
2、摄像头实时采集图像并保存:使用Qt设计了直观的用户界面,控制USB摄像头的打开、关闭以及实时显示摄像头捕获的视频流,并将采集到的视频流保存为图像。
环境说明
1、开发环境操作系统:Ubuntu18.04 64位版
2、交叉编译工具链:arm-poky-linux-gnueabi-gcc 5.3.0
3、开发板使用Bootloader版本:u-boot-2016.03
4、开发板内核版本:linux-4.1.15
5、开发板移植QT版本:qt5.6.2
图片处理和人脸识别
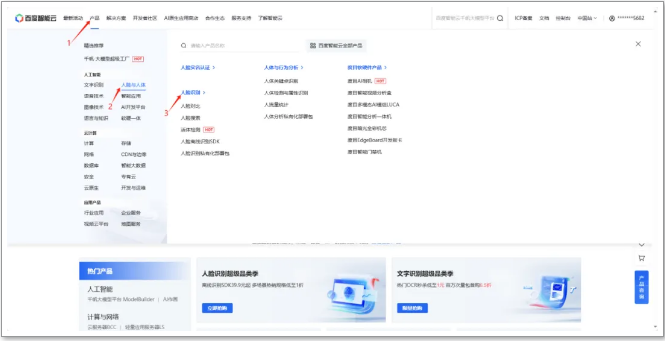
百度智能云网址:cloud.baidu.com
本次人脸识别的方案是通过百度智能云平台进行实现的。首先进入百度智能云网页- > 选择人脸与人体 - > 人脸识别。
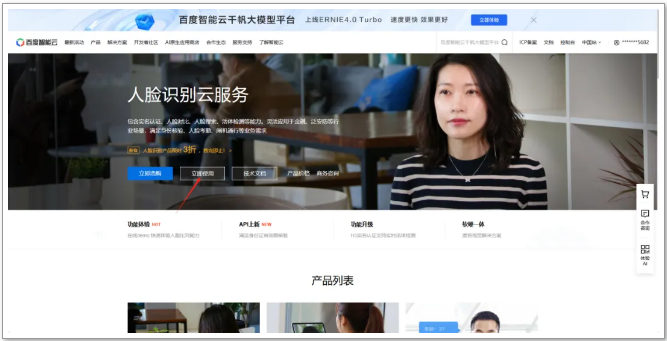
进入人脸识别页面之后可通过阅读技术文档来学习人脸识别的使用方法。
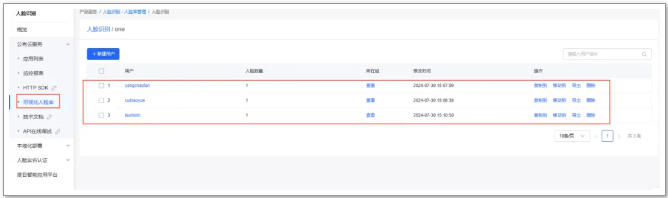
1、创建人脸库
(3)选择用户组场景类型,填写组ID,单击“确认”。
(5)单击“新建用户”,填写用户ID,添加图片,单击“确认”。
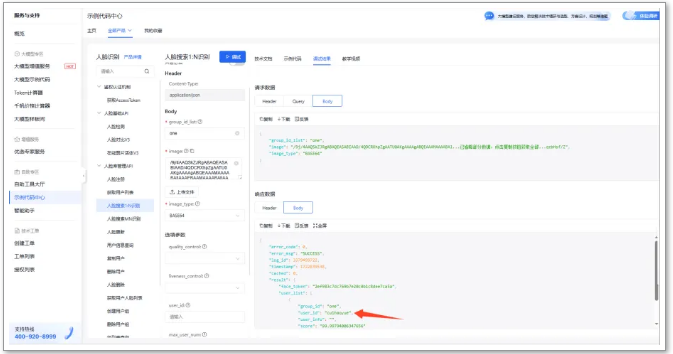
2、在线识别人脸图片
在本地实现之前可通过平台提供的在线验证方法进行验证,如下图,需要在旁边输入一张人脸图片的base64 编码的字符串或者选择上传一张人脸图片,并填写组ID即可进行在线识别。
3、识别本地人脸图片
本地实现人脸识别的方法需要将识别代码拷贝到本地,并需要实现一个将图片转换为base64编码的函数。需要输入自己的access_token(通过阅读文档可知怎么获取)。
inline size_t onWriteData(void *buffer, size_t size, size_t nmemb, void *userp)
std::string *str = dynamic_cast((std::string *)userp);
str->append((char *)buffer, size * nmemb);
std::string getFileBase64Content(const char *path, bool urlencoded = false)
const std::string base64_chars =
"ABCDEFGHIJKLMNOPQRSTUVWXYZ"
"abcdefghijklmnopqrstuvwxyz"
unsigned char char_array_3[3];
unsigned char char_array_4[4];
unsigned int bufferSize = 1024;
unsigned char buffer[bufferSize];
file_read.open(path, std::ios::binary);
file_read.read((char *)buffer, bufferSize * sizeof(char));
int num = file_read.gcount();
char_array_3[i++] = buffer[m++];
char_array_4[0] = (char_array_3[0] & 0xfc) >> 2;
char_array_4[1] = ((char_array_3[0] & 0x03) << 4) + ((char_array_3[1] & 0xf0) >> 4);
char_array_4[2] = ((char_array_3[1] & 0x0f) << 2) + ((char_array_3[2] & 0xc0) >> 6);
char_array_4[3] = char_array_3[2] & 0x3f;
ret += base64_chars[char_array_4[i]];
char_array_4[0] = (char_array_3[0] & 0xfc) >> 2;
char_array_4[1] = ((char_array_3[0] & 0x03) << 4) + ((char_array_3[1] & 0xf0) >> 4);
char_array_4[2] = ((char_array_3[1] & 0x0f) << 2) + ((char_array_3[2] & 0xc0) >> 6);
char_array_4[3] = char_array_3[2] & 0x3f;
for (j = 0; j < i + 1; j++)
ret += base64_chars[char_array_4[j]];
ret = curl_escape(ret.c_str(), ret.length());
std::string performCurlRequest(const char *pic_path, const std::string &token)
char *web_curl = nullptr;
CURL *curl = curl_easy_init();
if (!asprintf(&web_curl, "https://aip.baidubce.com/rest/2.0/face/v3/search?access_token=%s", token.c_str()))
perror("asprintf error");
curl_easy_setopt(curl, CURLOPT_CUSTOMREQUEST, "POST");
curl_easy_setopt(curl, CURLOPT_URL, web_curl);
curl_easy_setopt(curl, CURLOPT_FOLLOWLOCATION, 1L);
curl_easy_setopt(curl, CURLOPT_DEFAULT_PROTOCOL, "HTTPS");
curl_easy_setopt(curl, CURLOPT_SSL_VERIFYPEER, 0L);
curl_easy_setopt(curl, CURLOPT_SSL_VERIFYHOST, 0L);
struct curl_slist *headers = NULL;
headers = curl_slist_append(headers, "Content-Type: application/json");
curl_easy_setopt(curl, CURLOPT_HTTPHEADER, headers);
std::string base64_image = getFileBase64Content(pic_path, true);
std::string post_data = "image=" + base64_image + "&group_id_list=one&image_type=BASE64";
curl_easy_setopt(curl, CURLOPT_POSTFIELDS, post_data.c_str());
curl_easy_setopt(curl, CURLOPT_WRITEDATA, &result);
curl_easy_setopt(curl, CURLOPT_WRITEFUNCTION, onWriteData);
if (curl_easy_perform(curl) != CURLE_OK)
fprintf(stderr, "Curl request failed: %s\n", curl_easy_strerror(res));
int main(int argc, char *argv[])
std::string token = "24.2bc619cf9c09c32ce5af202ccc98c0c9.2592000.1724918062.282335-100710397";
result = performCurlRequest("/home/root/num/1.jpg", token);
std::string json = result;
std::regex pattern("\"user_id\":\"(.*?)\"");
if (std::regex_search(json, match, pattern))
std::cout << "read name is: " << name << std::endl;
1)依赖库编译
编译人脸识别的应用需要依赖Curl库、OpenSSL库、OpenCv库、JsonCPP库。详细的依赖库安装步骤请参考以下链接:
bbs.elfboard.com/forum.php?mod=viewthread&tid=496&extra=page%3D1
bbs.elfboard.com/forum.php?mod=viewthread&tid=495&extra=page%3D1
bbs.elfboard.com/forum.php?mod=viewthread&tid=497&extra=page%3D1
bbs.elfboard.com/forum.php?mod=viewthread&tid=498&extra=page%3D1
elf@ubuntu:~/work$ . /opt/fsl-imx-x11/4.1.15-2.0.0/environment-setup-cortexa7hf-neon-poky-linux-gnueabi
elf@ubuntu:~/work$ $CC demoFace.cpp -o demoFace \
-I /home/elf/work/opencv-3.4.1/install/include/ \
-I /home/elf/work/curl-7.71.1/install/include/ \
-I /home/elf/work/jsoncpp-1.9.5/install/include/ \
-L /home/elf/work/opencv-3.4.1/install/lib/ \
-L /home/elf/work/curl-7.71.1/install/lib/ \
-L /home/elf/work/jsoncpp-1.9.5/install/lib/ \
-lopencv_highgui -lopencv_core -lopencv_imgproc -lopencv_objdetect -lopencv_videoio -lopencv_imgcodecs \
-std=c++11 -lcurl -lcrypto -ljsoncpp -lstdc++
编译完成将文件通过scp拷贝到ELF 1开发板运行即可,这样就可以将本地的图片通过HTTPS发送到百度智能云进行识别,并将识别结果返回。
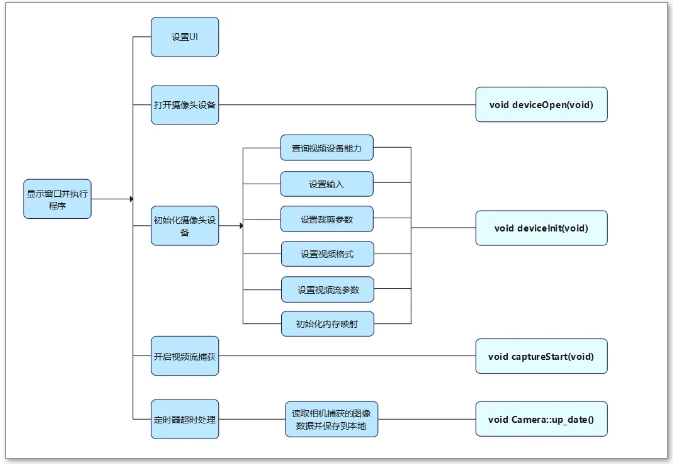
1、程序设计
在前面一个章节实现了对本地人脸图片的识别,下面来介绍如何通过摄像头进行人脸识别,采用USB摄像头进行识别,程序设计如下图所示。
 int main(int argc, char *argv[])
QApplication a(argc, argv);
w.setWindowFlags(w.windowFlags() & ~Qt::WindowMaximizeButtonHint & ~Qt::WindowMinimizeButtonHint);
QDesktopWidget* desktopWidget = QApplication::desktop();
QRect screenRect = desktopWidget->screenGeometry();
qDebug("screen.width = %d , screen.height = %d", screenRect.width(), screenRect.height());
this->imageWidget = new ImageWidget(this);
this->imageWidget->setBackgroundRole(QPalette::Dark);
this->imageWidget->setSizePolicy(QSizePolicy::Ignored, QSizePolicy::Ignored);
this->imageWidget->setObjectName(QString::fromUtf8("imageWidget"));
if (screenRect.width() == 800)
ui->pbt_start->setGeometry(60, 300, 70, 50);
ui->pbt_stop->setGeometry(190, 300, 70, 50);
this->imageWidget->setGeometry(QRect(5, 30, 350, 250));
else if (screenRect.width() > 800)
ui->pbt_start->setGeometry(80, 400, 70, 70);
ui->pbt_stop->setGeometry(260, 400, 70, 70);
this->imageWidget->setGeometry(QRect(6, 37, 500, 330));
fd = open(deviceName, O_RDWR | O_NONBLOCK, 0);
QMessageBox::about(NULL, "About", "camera open error");
struct v4l2_capability cap;
struct v4l2_cropcap cropcap;
struct v4l2_streamparm sparm;
if (-1 == xioctl(fd, VIDIOC_QUERYCAP, &cap))
QMessageBox::about(NULL, "Information", "no V4L2 device");
errno_exit("VIDIOC_QUERYCAP");
if (!(cap.capabilities & V4L2_CAP_VIDEO_CAPTURE))
QMessageBox::about(NULL, "Information", "no video capture device");
if (ioctl(fd, VIDIOC_ENUMINPUT, &input) != 0)
QMessageBox::about(NULL, "Information", "set input error");
if ((ioctl(fd, VIDIOC_S_INPUT, &input)) < 0)
QMessageBox::about(NULL, "Information", "set s_input error");
cropcap.type = V4L2_BUF_TYPE_VIDEO_CAPTURE;
if (0 == xioctl(fd, VIDIOC_CROPCAP, &cropcap))
crop.type = V4L2_BUF_TYPE_VIDEO_CAPTURE;
if (-1 == xioctl(fd, VIDIOC_S_CROP, &crop))
fmt.type = V4L2_BUF_TYPE_VIDEO_CAPTURE;
fmt.fmt.pix.width = width;
fmt.fmt.pix.height = height;
fmt.fmt.pix.pixelformat = V4L2_PIX_FMT_YUYV;
fmt.fmt.pix.field = V4L2_FIELD_ANY;
if (-1 == xioctl(fd, VIDIOC_S_FMT, &fmt))
errno_exit("VIDIOC_S_FMT");
if (width != fmt.fmt.pix.width)
width = fmt.fmt.pix.width;
// fprintf(stderr, "Image width set to %i by device %s.\n", width, deviceName);
if (height != fmt.fmt.pix.height)
height = fmt.fmt.pix.height;
// fprintf(stderr, "Image height set to %i by device %s.\n", height, deviceName);
min = fmt.fmt.pix.width * 2;
if (fmt.fmt.pix.bytesperline < min)
fmt.fmt.pix.bytesperline = min;
min = fmt.fmt.pix.bytesperline * fmt.fmt.pix.height;
if (fmt.fmt.pix.sizeimage < min)
fmt.fmt.pix.sizeimage = min;
sparm.type = V4L2_BUF_TYPE_VIDEO_CAPTURE;
sparm.parm.capture.capturemode = 0;
sparm.parm.capture.timeperframe.numerator = 1;
sparm.parm.capture.timeperframe.denominator = 30;
if (xioctl(fd, VIDIOC_S_PARM, &sparm) < 0)
errno_exit("cam s parm");
for (i = 0; i < n_buffers; ++i)
buf.type = V4L2_BUF_TYPE_VIDEO_CAPTURE;
buf.memory = V4L2_MEMORY_MMAP;
if (-1 == xioctl(fd, VIDIOC_QBUF, &buf))
errno_exit("VIDIOC_QBUF");
type = V4L2_BUF_TYPE_VIDEO_CAPTURE;
if (-1 == xioctl(fd, VIDIOC_STREAMON, &type))
errno_exit("VIDIOC_STREAMON");
unsigned char image_buf[921600 + 54];
this->imageWidget->setPixmap(image_buf);
int main(int argc, char *argv[])
QApplication a(argc, argv);
w.setWindowFlags(w.windowFlags() & ~Qt::WindowMaximizeButtonHint & ~Qt::WindowMinimizeButtonHint);
QDesktopWidget* desktopWidget = QApplication::desktop();
QRect screenRect = desktopWidget->screenGeometry();
qDebug("screen.width = %d , screen.height = %d", screenRect.width(), screenRect.height());
this->imageWidget = new ImageWidget(this);
this->imageWidget->setBackgroundRole(QPalette::Dark);
this->imageWidget->setSizePolicy(QSizePolicy::Ignored, QSizePolicy::Ignored);
this->imageWidget->setObjectName(QString::fromUtf8("imageWidget"));
if (screenRect.width() == 800)
ui->pbt_start->setGeometry(60, 300, 70, 50);
ui->pbt_stop->setGeometry(190, 300, 70, 50);
this->imageWidget->setGeometry(QRect(5, 30, 350, 250));
else if (screenRect.width() > 800)
ui->pbt_start->setGeometry(80, 400, 70, 70);
ui->pbt_stop->setGeometry(260, 400, 70, 70);
this->imageWidget->setGeometry(QRect(6, 37, 500, 330));
fd = open(deviceName, O_RDWR | O_NONBLOCK, 0);
QMessageBox::about(NULL, "About", "camera open error");
struct v4l2_capability cap;
struct v4l2_cropcap cropcap;
struct v4l2_streamparm sparm;
if (-1 == xioctl(fd, VIDIOC_QUERYCAP, &cap))
QMessageBox::about(NULL, "Information", "no V4L2 device");
errno_exit("VIDIOC_QUERYCAP");
if (!(cap.capabilities & V4L2_CAP_VIDEO_CAPTURE))
QMessageBox::about(NULL, "Information", "no video capture device");
if (ioctl(fd, VIDIOC_ENUMINPUT, &input) != 0)
QMessageBox::about(NULL, "Information", "set input error");
if ((ioctl(fd, VIDIOC_S_INPUT, &input)) < 0)
QMessageBox::about(NULL, "Information", "set s_input error");
cropcap.type = V4L2_BUF_TYPE_VIDEO_CAPTURE;
if (0 == xioctl(fd, VIDIOC_CROPCAP, &cropcap))
crop.type = V4L2_BUF_TYPE_VIDEO_CAPTURE;
if (-1 == xioctl(fd, VIDIOC_S_CROP, &crop))
fmt.type = V4L2_BUF_TYPE_VIDEO_CAPTURE;
fmt.fmt.pix.width = width;
fmt.fmt.pix.height = height;
fmt.fmt.pix.pixelformat = V4L2_PIX_FMT_YUYV;
fmt.fmt.pix.field = V4L2_FIELD_ANY;
if (-1 == xioctl(fd, VIDIOC_S_FMT, &fmt))
errno_exit("VIDIOC_S_FMT");
if (width != fmt.fmt.pix.width)
width = fmt.fmt.pix.width;
// fprintf(stderr, "Image width set to %i by device %s.\n", width, deviceName);
if (height != fmt.fmt.pix.height)
height = fmt.fmt.pix.height;
// fprintf(stderr, "Image height set to %i by device %s.\n", height, deviceName);
min = fmt.fmt.pix.width * 2;
if (fmt.fmt.pix.bytesperline < min)
fmt.fmt.pix.bytesperline = min;
min = fmt.fmt.pix.bytesperline * fmt.fmt.pix.height;
if (fmt.fmt.pix.sizeimage < min)
fmt.fmt.pix.sizeimage = min;
sparm.type = V4L2_BUF_TYPE_VIDEO_CAPTURE;
sparm.parm.capture.capturemode = 0;
sparm.parm.capture.timeperframe.numerator = 1;
sparm.parm.capture.timeperframe.denominator = 30;
if (xioctl(fd, VIDIOC_S_PARM, &sparm) < 0)
errno_exit("cam s parm");
for (i = 0; i < n_buffers; ++i)
buf.type = V4L2_BUF_TYPE_VIDEO_CAPTURE;
buf.memory = V4L2_MEMORY_MMAP;
if (-1 == xioctl(fd, VIDIOC_QBUF, &buf))
errno_exit("VIDIOC_QBUF");
type = V4L2_BUF_TYPE_VIDEO_CAPTURE;
if (-1 == xioctl(fd, VIDIOC_STREAMON, &type))
errno_exit("VIDIOC_STREAMON");
unsigned char image_buf[921600 + 54];
this->imageWidget->setPixmap(image_buf);
2、应用编译及测试
elf@ubuntu:~/work/camera-demo$ . /opt/fsl-imx-x11/4.1.15-2.0.0/environment-setup-cortexa7hf-neon-poky-linux-gnueabi
elf@ubuntu:~/work/camera-demo$ qmake
elf@ubuntu:~/work/camera-demo$ make
2)拷贝camera-demo到ELF 1开发板的/home/root路径下,运行测试。
root@ELF1:~# cp /run/media/sda1/camera-demo ./
root@ELF1:~# chmod 777 camera-demo
root@ELF1:~# export DISPLAY=:0.0
root@ELF1:~# ./camera-demo
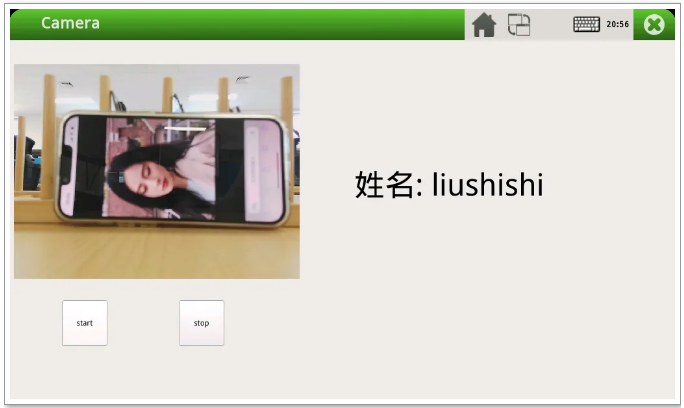
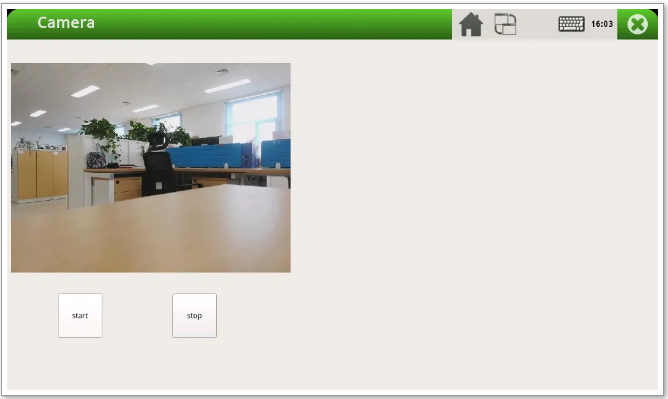
点击start按钮之后,使用ls num路径下查看会有摄像头拍摄的图片。液晶屏上会实时预览摄像头拍到的图像,如下图所示:
在这里就可以和前面人脸识别结合起来了,比如摄像头里面的画面是一张人脸信息,通过截取摄像头中的实时画面到本地,然后上传到百度智能云进行识别,至此就完成了通过摄像头进行人脸识别的过程。
在此基础上再次完善应用,识别人脸的应用将识别到的人脸信息保存到文本中,基于摄像头的应用读取文档中的人脸信息显示在Qt界面中。
1、确保开发板已连接USB摄像头和屏幕
2、设置Wi-Fi连接
root@ELF1:~# elf1_cmd_wifi.sh -i 8723 -s 账号 -p 密码
3、执行应用
root@ELF1:~# ./camera-demo &
root@ELF1:~# ./demoFace
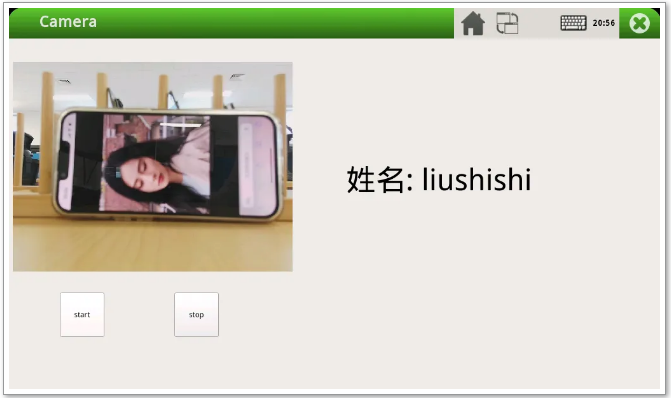
单击“start”按钮,识别结果如下图所示。


![ELF 1 [主控:i.MX6ULL]](/storage/20230915/6504156616031.png)


![ELF 2 [主控:RK3588]](/storage/20241127/6746808ef36ed.png)
![ELF2_Lite [主控:RK3576]](/storage/20260105/695b71ecdd6ef.png)
![ELF-RV1126B [主控:RV1126B]](/storage/20260105/695b8a5bd7193.png)
![ELF-RK3506 [主控:RK3506B]](/storage/20260105/695b9a72f304d.png)
![ELF 1S [主控:i.MX6ULL]](/storage/20230915/650415d4d8d83.png)


